 |
|
|
 |
Click on Category to add Article
Search
 |
 |
 |
|
 |
|
|
|
Author Waynder
Date Sat Aug 12, 2006 3:35 pm
Views 6324
Description Mojito AC
Category Engine Tech info
Type Engine modifications
Rating No votes [Rate Article]
|
|
Installation of 70cc kit
|
Its very simullar for other AC cooters
Let me start by letting you know some basics...
1. If you tamper with the motor in any way to de-restrict it, some dealers will completely void your warranty. So make sure this is a sacrifice you are willing to make.
2. ALL bolts and socket head cap screws are in metric! Don't try to work on your vehicle if you don't have metric tools, you will just end up messing up the heads.
3. I am NOT a mechanic, I have just been working on motorcycles for a long time and know a little about what I am doing. I just take pictures of what I do and how I do it, then I post them for people who don't know what to do.
4. I feel the easiest way to do this is to completely remove the entire engine and drive train to install it. I have heard that you can do this in-frame, but I didn't want the bother. So you may or may not have to remove everything I did to install the kit.
5. Since I am not a mechanic, if you feel that I am incorrect in my installation procedures, or feel that I have neglected to mention something important, feel free to add to these postings. I promise my feelings won't be hurt. Likewise, if you feel these are beneficial to you, let me know so I know that I am not just wasting my time doing this.
OK, lets get started. Make sure you have a clean environment to work in. You are going to be dealing with delicate parts that dirt can have a very adverse effect on.
-----------------------------------------------
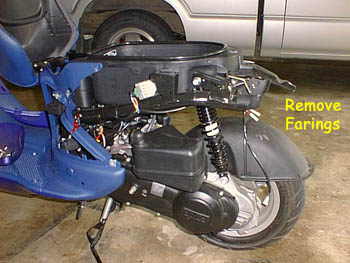
First start by removing the farings that are in your way. Sometimes the more the better. On my mojito, I only removed the rear faring and the small side farings.
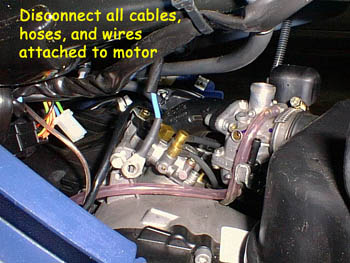
Next you will need to disconnect ALL CABLES, WIRES, and HOSES!!! Make sure nothing attached to the frame is attached to the motor. Don't forget about your brake cable!
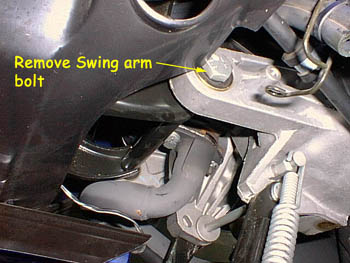
After all the cables, hoses and wires have been disconnected, unbolt the coil spring at the bottom.

Once the shock is disconnected, and you are sure there is absolutely nothing attached to the motor, remove the main chassie bolt from the swing arm.
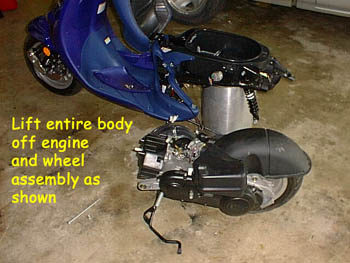
When the bolt is removed, the scooter will be in two pieces. You may want a second person to hold up the main frame. Simply lift the frame off the engine and set it aside on something. You will now be able to install the big bore kit with greater ease.
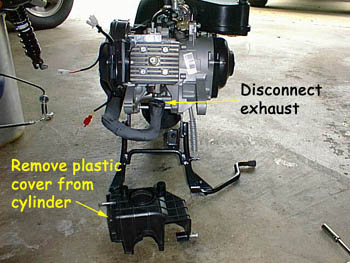
You will first have to start by removing the spark plug, the plastic cover from the cylinder head and disconnecting the exhaust.
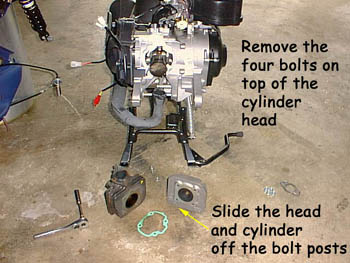
Next remove the four bolts located on the top of the head. After the bolts are off gently pull the head off, followed by the cylinder casing. Remove the gasket at the bottom of the cylinder, malossi provides you with a new one to replace it.
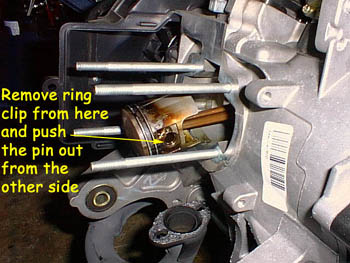
Now you have to remove the piston. There are ring clips located on each side of the connection pin. I used a very small screw driver and snapped it out. Then push the pin out from the other side, being careful not to damage the roller bearing cage.
Now you have everything removed, we are ready to install the new kit. This is a comparisson of the old cylinder to the new malossi kit.
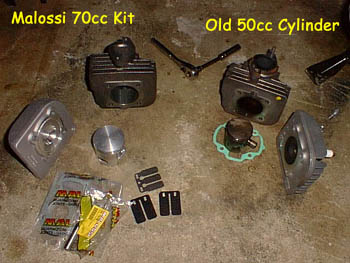
Here is a comparisson of the 50cc piston and cylinder to the new 70cc kit. Notice the difference in diameter!!! MORE DISPLACEMENT RULES!!!

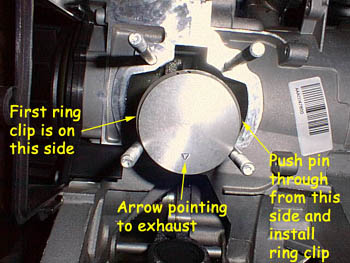
The first step is to install the piston. You will need to put a ring clip on one side of the piston. The air cooling box to the left of the motor (Lookig at it) can get in your way, so put the pin on the left side of the arrow when the arrow is pointing at you. That arrow will be installed pointing towards the exhaust.
Also put the rings on now. Be carful not to stretch them too much, as they will break in half. Slide the first ring over the top and into the first groove on the piston. Then step it down to the next groove. Then install the other ring in the first groove. You will notice a small pin located inside each groove. These pins should line up where the rings are split.

Now we need to attach the piston to the connecting rod. Place the piston over the connecting rod and line up the bearing cage with the hole and slide the pin through. After the pin is in, install the other clip that came with the kit. This is done easiest with a small pair of needle nose pliers.
Now we need to put the cylinder on. Before you put it on, take a small amout of 2-cycle oil and rub it all over the cylinder walls. This will remove the chance of scoring the walls on initial start up. Also a small bolt post should have come with your kit. This is for the exhaust. You will remember that you exhaust has a bolt and a nut holding it on. Simply screw the short side of the threads into one of the threaded holes next to the exhasut port on the cylinder.
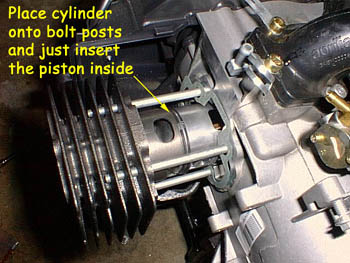
Place the cylinder gasket that came with the kit onto the four bolts and push it all the way down to the motor. Now place the cylinder onto the four bolt posts with the exhaust port facing down. Slide the cylinder to the piston until the piston just starts to enter the cylinder up to the first ring.
Make sure that the split in the rings are linned up with the little pins located in the groves on the piston. Once the first ring is linned up, squeeze the ring and slide the head to the second ring. Make sure the split is linned up and squeeze the second ring and slide the cylinder all the way on.
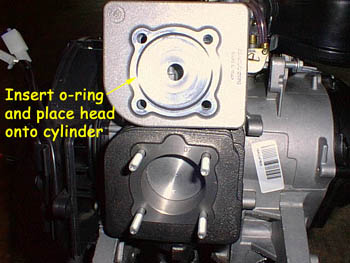
Insert the o-ring onto the head and place the head onto the cylinder.
Now replace the four nuts onto the head and tighten them up pretty snug.

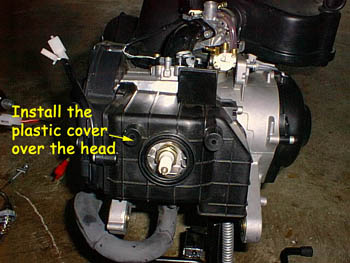
Now re-install the plastic cover over the head and re-attach the exhaust. Then put your spark plug in.
That is it for the entire installation. Now all you have to do is put everything back together! Start by putting th frame back on and sliding the main chassie bolt through. This can be pretty difficult to get lined up, it is deffinately a 2 man job. Once the main bolt is in, snug the nut up and start re-attaching all your hoses, cables and wires. Don't forget to re-attach your brake cable!!! After you get everything re-attached, bolt your shock back on and start it up. Don't run the throttle up too high, you need to wear your rings in a bit before doing this. Try to stay at about half throttle for a while. I usually do this for the first 5 or 6 times ridding, which is about 5-10 miles each run, and letting the engine cool entirely before riding again.
Check your spark plug for jetting. You may need to adjust your needle if you are running your stock carb. You don't want to run too rich or lean.
---------------------------------------
OK, now I bet you are all wondering, if I spend the time and the money on this, will it all be worth it??? I say YES!!!!
Before the kit, I was running stock everything (Derestricted) except an arrow exhaust and a .8mm jet in my carb. I was holding 45MPH with no problem. After the big bore kit, I saw a HUGE increase in power and acceleration, but not much increase in top speed. Maybe about 3MPH more on the top end. Then I installed a gear kit and a new variator. I played around with the roller weights for a while, and now I am getting about 53MPH steady. I can hit about 58MPH ducked down and going downhill.
I think the gear kit is A MUST HAVE when you have a big bore kit. Before I installed it, the engine would wind out so fast. Now it doesn't wind out as it did before, and it deffinately increased my top speed!!! The gear kit is the same as the gear kit for an SR ditech. (I know because that is what I bought, and it works great!!!)
I am excited to see how much differance a larger carb is going to make on this. I am still currently running stock carb with .8mm jet.
These speeds were done by my wife following me in the jeep to see how fast it goes. It is funny, I burry the speedo at about 40-45MPH, but the speedo goes up to 50!!?!?!? Darn these inaCcurate speedo's!!!
Good luck installing yours!!!
----------------------------------------------------
----------------------------------------------------
VERY SPECIAL THANX TO SCOOTNFAST FOR PERMISSION OF USING HIS TUTORIAL. VISIT HIS SITE FOR MORE USEFULL INFORMATIONS. http://www.scootnfast.com |
| |
|
|
|
You cannot post new articles in this category
You cannot edit your articles in this category
You cannot delete your articles in this category
You cannot comment articles in this category
You can rate articles in this category
Articles need no approval in this category
Article edits need no approval in this category
|
|
|
|
 |
|
 |
| |
 Home
Home